


EComposer is #1 Drag & Drop Page Builder that helps you create professional Shopify websites without any coding. Provide 100+ design elements and 300+ templates, there’s no limit to what you can build. Install EComposer for free today and start building the store you’ve always wanted.
Guide To Staff Permissions In Shopify (From Setup To Security)
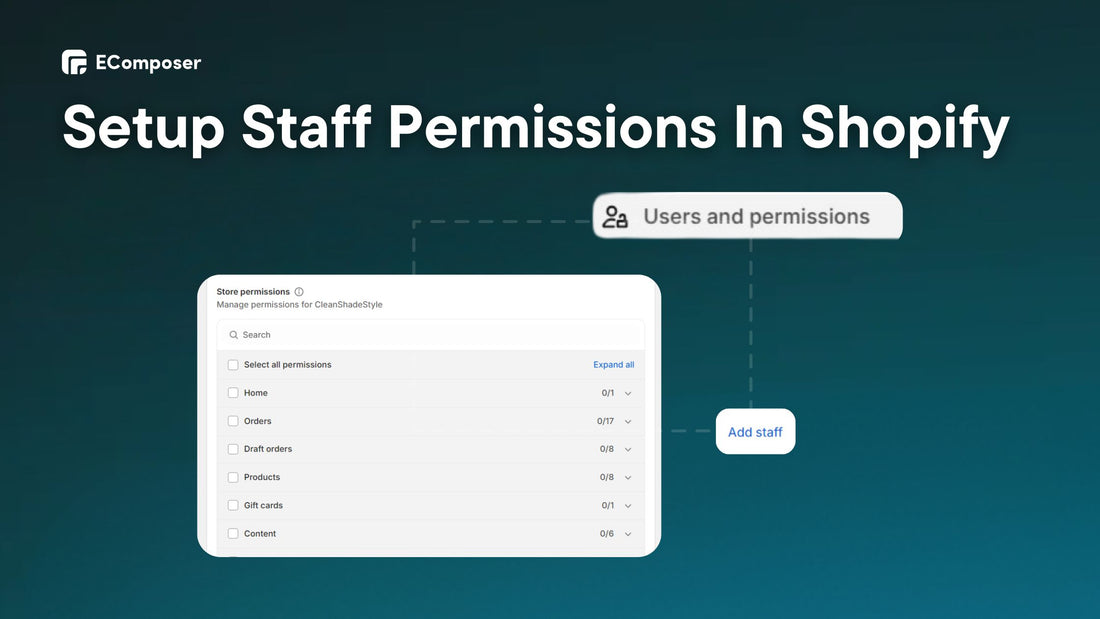
Table Of Contents
Staff permissions Shopify is a crucial feature. As your business expands, you'll need more staff for product fulfillment and customer service. Giving them access to your Shopify admin panel is necessary, but you must do it safely.
Whether you’re a new store owner or looking to optimize your setup, this deep article will help you set up and secure Shopify staff permissions.
Keep reading to find out!
What Are Shopify Staff Permissions?

Shopify enables you to provide granular permissions, allowing you to select which areas and features each staff member can access. This gives managers full access while limiting store staff to important functions, like managing supplies or finishing orders.
As soon as you save the changes to permissions, staff members will instantly see the Shopify admin panel with the access you gave them.
Things To Think About Before Giving Shopify Store Permissions
Staff permissions are essential for running your Shopify business smoothly. However, allowing the appropriate access is critical to protecting sensitive information.
Here are some important elements for a secure setup:
- Principle of Least Privilege: Give each staff member only the rights they need to do their job. It lowers the risk and ensures that staff can do their jobs well.
- One Login Per Staff Member: Do not use group logins. It makes people responsible and makes it easy to keep track of what's going on.
- Restrict Access to Sensitive Data: Only the most reliable employees should have access to order, customer, and cash information.
- Mitigate Single Points of Failure: You might want to let more than one person in for important management jobs. This stops people from doing bad things if one account is hacked.
- Require Two-Factor Authentication: Tell staff to enable 2FA for added security. This requires a code, too, for a password, which makes it much harder for people who aren't supposed to be there to get in.
Read more: How can Shopify merchants enable 2FA?
Doing these things can give your employees more power while keeping your store's critical data safe.
3 Steps To Add & Manage Staff Account Permissions On Shopify
This guide will take you through the three main processes for creating and maintaining staff accounts with suitable permissions on Shopify:
Step 1: Adding Staff Accounts
Staff accounts enable your team members to log in to your Shopify shop using unique usernames and permissions. To add staff, you must be the shop owner or have certain rights.
- Edit permissions
- Add and remove staff permissions
Also, you need the Manage Point of Sale staff permission and Shopify POS permissions to add POS app-only personnel to your admin and Shopify POS (We will give detailed instructions in step 2).
Here are steps to add staff:
First, navigate to Settings > Users and Permissions in the Shopify admin panel.
Next, find and click the "Add Staff" button.

Then, type in the employee's full name (which should match their government ID) and email address.
Now, select the particular permissions for this staff member. You may choose specific permissions or click “Select All” to get full access.

NOTE: You may provide access to different areas of your shop, including goods, categories, orders, customers, and more.
Under the "App permissions" section, check the box for the apps you offer workers access to.

Step 2: Give Shopify POS Permissions
After step 1, under the "Point of Sale access" section, tick the box next to "Access Point of Sale".
Next, you can choose the role that fits their job in the POS app from the list of POS roles, such as Cashier or Manager.
In the PIN box, you can select "Generate random PIN" (Optional) to generate a secure code or input a specific PIN for the employee.

Important: They must keep their PIN secure.
NOTE: You may also establish custom POS roles in Shopify to have additional control over worker access to the app.
Read more: 10+ Best Shopify POS Apps.
For further details, refer to Shopify's resources for managing Point of Sale staff, including guidelines on establishing and allocating POS roles.
Step 3: Send Your Invite
Once done, click the "Send invite" option.
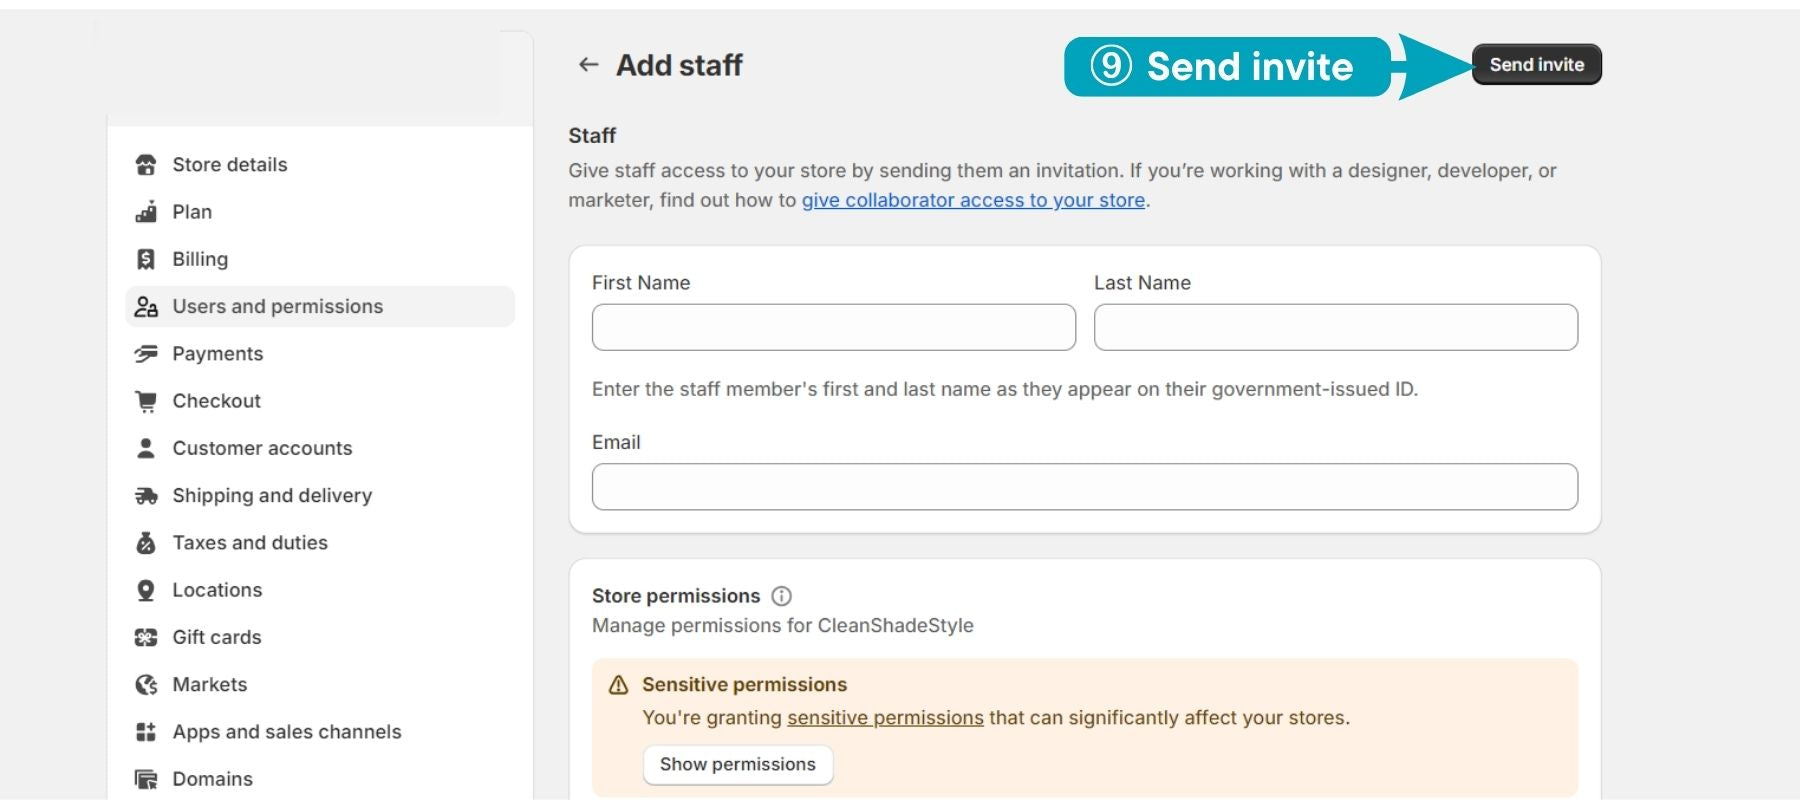
The staff person will get an email inviting them to make a login. These invites will expire after 7 days.
NOTE:
- If you need to change the email address for a current staff member, just create an extra staff member and input the new email.
- If you need to change the business owner's email address, add a new staff member and transfer ownership to them.
How To Change The Status Of Your Staff Member's Account On Shopify?
This guide will let you deactivate a temporary employee, remove a leaving team member, or alter access permissions:
Option 1: Deactivate Or Reactivate Staff Member's Account
There are two primary reasons you may need to deactivate or reactivate staff accounts in your Shopify store:
- Deactivating Unused Accounts: Users with usernames and passwords might access your shop and make unauthorized modifications. This vulnerability is removed by deactivating these accounts.
- Temporary Employee Access: When employees are on leave, casual hires, or don't have much to do with a project, disabling their accounts keeps other people from accessing the store when they're not working.
Maintaining shop security necessitates controlling employee access. Here's how:
- This is in the Shopify dashboard panel under Settings > Users and permissions.
- Next, select the name of the staff member whose account you want to cancel.
- Under the staff member's information, choose the "Suspend access" option.

- Finally, click Suspend to confirm the deactivation.
If you need to re-enable a deactivated account, you can easily reactivate it:
- Locate the deactivated staff member in the Users and Permissions list.
- Select Reactivate next to their name.
NOTE:
- The cards are instantly locked when a staff member with active Shopify Credit secondary cards is deactivated.
- Reactivating such a staff member unlocks all linked cards.
These steps will help you control staff access and keep the store safe.
Option 2: Remove A Staff Account
You may delete staff accounts from your Shopify store as a shop owner or staff member with "Add and remove staff" capabilities. This move can't be undone, so be careful as you go.
Before deleting:
- Shared Accounts: Create individual accounts for active personnel before deleting a shared account. This preserves access.
- Shopify Credit Cards: Removing a secondary cardholder from active Shopify Credit cards cancels them.
Here are steps to remove a staff account:
Access Users and Permissions. To delete a staff member's account, click their name.
To remove staff members from your shop, click "Remove staff name ¨.
To ensure security, enter your staff account password to confirm the deletion.
When you click Remove, the staff member's account is completely erased and unavailable via the Shopify admin.

Option 3: Remove Staff Device From Shopify
While you cannot target individual devices, you may log the employee out of all current sessions on all devices. This causes them to re-enter their login credentials on any device access to the lost device.
The store owner or a worker who can "Revoke access tokens for other staff" is the only one who can start this process.
First, go to Users and Permissions.
Next, click on the employee's name who lost their device.

Then, find the "Revoke Access" button; it won't list any individual devices, and press it.
In the window that comes up, click "Revoke."
Follow these procedures to prevent the lost device from accessing your Shopify shop.
Tips For Setting Up Staff Permissions For A Large Team Efficiently On Shopify
Managing permissions for a big workforce on Shopify necessitates a deliberate strategy to maintain security and efficiency. Here are some suggestions to help you do it efficiently:
Leverage Staff Permissions Effectively
According to James C. Collins, author of Good to Great:
"Great vision without great people is irrelevant."
This phrase stresses the importance of knowing your team's strengths, which can be found by listing their jobs and skills.
That’s why you should identify the different positions on your team.
Order fulfillment, product management, marketing, and customer service are examples. Read more about Shopify's general staff rights. These groups enable you to group certain sets of permissions.
If your team structure includes recurrent roles (for example, all customer service representatives need comparable access), develop permission groups for them. This streamlines adding additional employees with similar tasks.
Regularly View Login History
As a Shopify business owner, you must ensure the security of your employees' accounts. Regularly examining login history is an essential step toward keeping a safe workplace.
This is how you do it:
Go to Settings and then to Settings > Users and permissions, and choose the name of the staff whose login history you want to see.
Scroll down to the "Recent access to Store" area. This section provides the five most recent login sessions for the specified staff member.

For each login session, you'll see detailed information, including:
- Date: The date and time of the login.
- IP Address: The unique identifier of the device used to log in.
- ISP (Internet Service Provider): The internet service provider the manyses.
- Login Location (if available): The approximate location from where the login occurred. Hovering over the information symbol (i) might reveal this detail.
- Web Browser & OS Version (if available): The type of web browser and operating system used for the login (hovering over the information symbol might provide this detail).
Look for any unusual login activity, such as
- Logins from unusual places or nations where the employee doesn't work.
- Logins occur at irregular times outside of regular business hours.
- Short-term login attempts from the same IP address may signal a brute-force assault.
- If you identify any suspicious activity, investigate further. You might need to:
- Reset the staff member's password.
- Contact a staff member to confirm your login attempt.
In severe circumstances, you should deactivate the staff account until addressed.
Create Roles For Staff To Access Multiple Shopify Shops (For Shopify Plus)
While maintaining a lot of Shopify businesses might be difficult, organization permissions provide a strong solution (only accessible to the Shopify Plus plan).
Read more: Shopify Plus vs. Shopify: Which is Best for Your Business?
It includes Stores, Users, Analytics overview, and Billing. Staff personnel with these rights can change all shops in your organization, including those without store-level access.
For example, if your company has four shops, you may grant a staff member User authorization and access to one. This staff person can handle user access, permissions, and security settings in stores without store-level rights.
Key points to remember:
- Minimum: Every position needs one organization's authorization.
- Permission Combination: You may mix organization and store-level rights within a single role.
Here's a way to create a Role with organization permissions:
Navigate to Settings > Users > Roles in the Shopify admin panel.
Click "Add Role" and provide a descriptive name for the position.
Under "Organisation permissions," pick the rights you wish to give the role (e.g., Users, Analytics overview, Billing).
(Optional) To provide access to certain stores:
- Click "Add store access" under "Store permissions."
- Choose specific retailers or all stores to grant the same rights.
- Click "Continue" and pick the rights you want for workers in those shops.
Finally, you choose the “Save” button.
FAQs
1. What Is Assigning Shopify Permission Levels?
Shopify provides defined permission levels to guarantee security and efficiency:
Total Access:
- Who Gets It: Save this level for trusted people like shop owners and administrators.
- What It Allows: Full access gives you complete control over your store's items, orders, customers, and settings. This grants them a "master key" to your Shopify shop.
Limited Access:
- The Power of Customisation: Limited access lets you specify staff duties.
- Role-Need Matching: Customise permissions by staff role. A customer support professional may need access to see and manage client data but not save settings.
- Giving the Right Tools: By limiting access, you provide your employees the tools they need to succeed without giving them unwarranted powers. This ensures security and worker efficiency.
No Access:
- Who It's For This level is for external consultants and temporary workers who don't need Shopify store access.
- Keeping Things Secure: By designating "No Access," you stop them from accessing the Shopify admin panel, protecting your store's data.
Remember that assigning appropriate access levels is critical for a safe and efficient team environment. Select the level that best represents each employee's position and responsibilities.
2. Can Staff Members With Order Fulfillment Permissions Issue Refunds?
This depends on how Shopify's "Order Fulfilment" permission group is established.
By default, Order Fulfilment permissions are unlikely to contain the ability to issue refunds. This permission group is usually used for jobs like picking orders, packing them, and sending them out. Refunds involve money and may need higher authority.
However, Shopify allows you to customize permissions. You might have given staff in your store the "Order Fulfilment" permission group the power to give refunds.
Read more: What to Know About Shopify's Restricted Product Policies.
3. Are There Resources Available For Further Learning About Staff Permissions?
Learn more about Shopify staff permissions with these resources:
- Shopify Help Center.
- Shopify Plus Resources (if applicable).
- Shopify Experts.
- Many eCommerce blogs (Like EComposer's blog) and newspapers cover Shopify staff permissions. Try searching for "Shopify staff permissions best practices" or "Shopify organization permissions guide" to get results.
This information will help you build a safe and effective access control solution for your team.
Key Takeaways
Effective staff permission management in Shopify empowers your team and protects your business. Follow the steps in this guide to set up a safe and efficient access control system. Remember to provide permissions appropriate for each team member's job and duties.
Organization permissions offer a powerful solution for businesses managing multiple stores (available on Shopify Plus plans). They allow you to manage staff access across the entire organization.
We know managing several Shopify businesses may be challenging and time-consuming. In contrast, this guide focuses on staff permissions for those seeking a solution to streamline multi-store management. Here’s your solution: EComposer's drag-and-drop page builder makes it simple to design beautiful landing pages, product pages, FAQs, contact pages, etc., and sections for all your businesses.

Try EComposer for free now and see how it can transform your Shopify shop management experience.


0 comments